![]() It’s common these days for clients to want to upload new images to their web site, and we build web sites that make that process relatively easy, if your resize images first. Here are some tips for making images the right size for your web site.
It’s common these days for clients to want to upload new images to their web site, and we build web sites that make that process relatively easy, if your resize images first. Here are some tips for making images the right size for your web site.
Common Errors With Image Uploads
One of the most common errors we see with images that get uploaded, however, is that they are too large. They take up too much disk space, and end up using up a lot of unnecessary bandwidth. This can end up costing you extra in hosting fees. They also are slow to load, which can annoy customers.
Photos taken from your phone or digital camera are generally saved at both a larger size and greater resolution that necessary for displaying on the internet. In order to use photos from cameras or phones you need to do a few things to them with a simple image editing program. (Mac users can use the Preview application, for example.)
Resize Your Images Before Uploading
The first thing to do is work with a copy, not your original. That way, you can always have your nice, big version for other purposes. You want to create a web version.
1. Open the image in your image editing program. (ex. Photoshop, Preview, etc.)
2. Duplicate and rename your image.
3. Find the menu item to resize an image. (Image> Image Size… in Photoshop; Tools> Adjust Size…. in Preview)
Set Your Resolution, Then Size
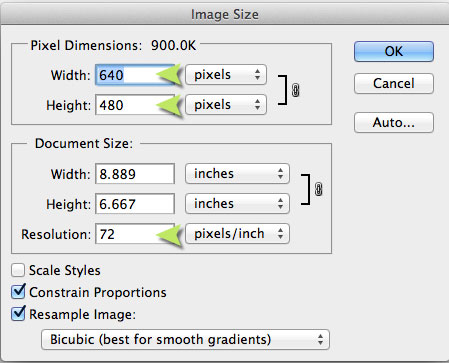
4. Change the resolution of the duplicated image to 72 dpi (web) from whatever it is currently set, often 300 dpi or higher (print). The image will be resized and you may need to use your magnification tool to enlarge it again to 100% size.
5. Enlarge (or reduce) your magnification to 100%.
6. Next, set the width and height of the image. Note: in some image editing programs, such as Photoshop, you can change the resolution then the width and height in a single panel. Always set your resolution first, then do the width and height.
Remember 72 dots per inch means that if you want your image to appear two inches tall, height would be set to 144 pixels, or 2 inches. You might sometimes here “pixels per inch” (ppi) instead of dots per inch (dpi). For our purposes, consider them to be the same thing.
Looking at your “re-resolutioned” and re-sized image, it should appear to be the size it will appear when you upload it to you website.
7. The final step is to save a version of the new image. Choose jpeg with a medium to medium high quality, or PNG, for best web results.
Still Having Trouble With Your Image Resize?
We feel your pain. It isn’t intuitive and it is hard to know what you are doing if you don’t do this sort of work often. Give us a call and we can get your images looking great for display on the web. MuseArts has been resizing and optimizing images for web pages for decades.